Friday, January 19, 2007

ATC Swaps


I am slowly fulfilling my swap obligations! Today I sent off 3 ATC's. 2 went to the U.K. These were made out of my "purple lace" fabric, with the addition of a couple of wrapped tyvek beads. The 3rd one is for ATC-WDU group, an Australian/New Zealand ATC swap group - and the theme this month was New Beginnings. My ATC represents the addition of handstitching in my work, as that is what my aim is. I love the combination of hand and machine stitching. Then I have 2 left over which will be added to some others I will be making for the ATC Challenge which will be on display at the Australian Quilt Convention.

Wednesday, January 17, 2007

Postcard for Anna


Being one of the first four people who said "yes please I'll have one of your lovely fairy cards", I received an absolutely gorgeous fairy tale postcard from Anna. Please visit her site and see her beautiful work!! So, I have made her one in return and I will send it tomorrow. The background is my cling wrap fabric.

Sunday, January 14, 2007

Green/Turqoise 1" Art Squares and Buttonhole Stitch


No. 4 colour finished!! Here are the finished green/turqoise 1" Art Squares. These are also to be included in my TAST challenge for this week, as I've used buttonhole stitch around the edges of them all, and have also included a buttonhole pinwheel.

Saturday, January 13, 2007

To Cheer Myself Up!!


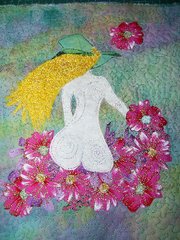
Just wanted to post a picture of one of my very favourite textile pieces. It was a technique from CPS mag, Spring 2005 - written by our very own Dale Rollerson! I loved doing it, and am extremely happy with how it turned out. Don't you love a textile art success story?! In fact, this was my inspiration to head in the direction I'm going now.....

Cling Wrap

Hi all! Just wanted to clarify that I'm not claiming to have invented the method of using cling wrap with fabric - it will have been written up somewhere. In fact, I can remember reading about using cling wrap in one of my many magazines or books quite a while back, and thinking "how cool". As I stated in one of my posts - I saw a box in "Creative Recycling in Embroidery" by Val Holmes, and the blurb stated it was made with cling wrap and fabric - so I thought I'd just experiment.... It's a wonderful method of making a very stitchable type of fabric. I posted how I made it, as I had so many people asking how it was done. I feel better now that I've had my little say - thanks for listening.

Friday, January 12, 2007

Postcard for Francoise


I made a "Happy Birthday" card for Francoise from FAF Group. It was made from the red cling wrap fabric. Hope she likes it - I sent it today - naked and postmarked from Australia to Belgium.

Thursday, January 11, 2007

How I made "my cling wrap" fabric....

1. Lay out your cling (saran) wrap over top of some baking paper to protect the ironing surface. My wrap is red, courtesy of our lovely SueB.

2. Place bits and pieces of fabrics on the top of wrap so the surface is covered, and they overlap each other - doesn't matter if there's gaps here and there - that can be rectified in the next layer. I use mainly synthetic fabrics, but throw in some cotton/silk too. In this sample I have used a lot of netting and organza.

3. Turn your iron on to get hot - I use the hottest setting and my very oldest iron. See where I have taped it back together after I dropped it.....

4. Place another layer of cling wrap over the top, then some baking paper over that - then iron. Just keep an eye on how the layers are adhering - depends on how hot your iron gets. You only want it all to adhere. Doesn't matter if you get holey bits, that can be nice, or can be fixed up in the next layer.

5. Grab some more fabric, or threads or whatever you think might be nice, and start laying on the next layer. I used similar fabric as before, and if any bits needed toning down, added some sheer organza over the top of these. I also added some silk throwsters waste to give it some texture.

6. Place another piece of cling wrap over the top, cover with baking paper and iron again. Just keep ironing until you have it how you like. This is where you decide if you want another layer or not. With this piece I have just left it at 2 layers. I also turned it over and ironed the bottom too - just keep an eye on it when ironing.....


This is my finished piece!!!